MAGI Project

MAGI project
The idea
I have been thinking about the idea of building a cluster made of Raspberrys and update my home infrastructure a bit. Right now, I use a Raspberry Pi 4 B as a little server to run Pi Hole, personal projects, Plex… and also as a NAS. All this sevices are run using Docker containers because I love Docker and the management is easier that way, allowing me to recover from a failure really quick.
Since I’m increasing the load to it with more things and some application like Plex sometimes consumes A LOT a cluster could be awesome. After thinking a bit my options I discovered PicoCluster:

They have a lot of cool things and one of them is exactly what I needed, a little cluster with 3 Raspberrys. I bought it, if it is not obvious by now, and the plan is to migrate some of the things I have running in my actual Pi to it.
The idea is simple, my initial Raspberry will only have essential network services like Pi Hole (Working as DHCP and DNS server), Samba (Used for backups and to add things to Plex) and Netdata for monitoring it 24/7 and alert me if something is going wrong. Meanwhile, the cluster will use that Pi for storage provisioning and will host the rest of application like Plex, Nextcloud, personal projects…
Also, as part of this project I want to make sure I can still recover from a terminal failure without a ton of problems and learn a bit more of Ansible. The idea here is that all the cluster initial installation and setup will be performed by an Ansible Playbook that I will create from scratch.
What are you going to read
Anthares from the future here! The initial idea sounds great right? A cluster of Raspberrys what a cool thing! Well, looks like migrating all to Kubernetes from a Docker setup is not as straightforward as I thought. Also, while I was working on it I started thinking about improving the security of the new infrastructure and fix some problems I had taking advantage of some Kubernetes features.
What I though It was going to be a fast and smooth process (I already have worked with Kubernetes and Helm before) ended up being a really long journey of reading documentation and unexpected problems BUT I really learnt a lot.
I tried to cover all the process I followed during my journey so I invite you to relax, get a coffee or something and join me in this adventure, Its going to be a long one. Keep in mind that this is not a Kubernetes tutorial, if you want to follow my steps you are supposed to already know a bit about how things works in Kubernetes.
Oh! I almost forgot about it. Keep in mind that the 64 bit version of Raspbian was just released yesterday, 02/04/2022, so obviously during the installation process of this write up I had to install a pre-release version of it.
Assembly
After waiting a bit (I’m in Spain so it is a long way from the US) a received my order!
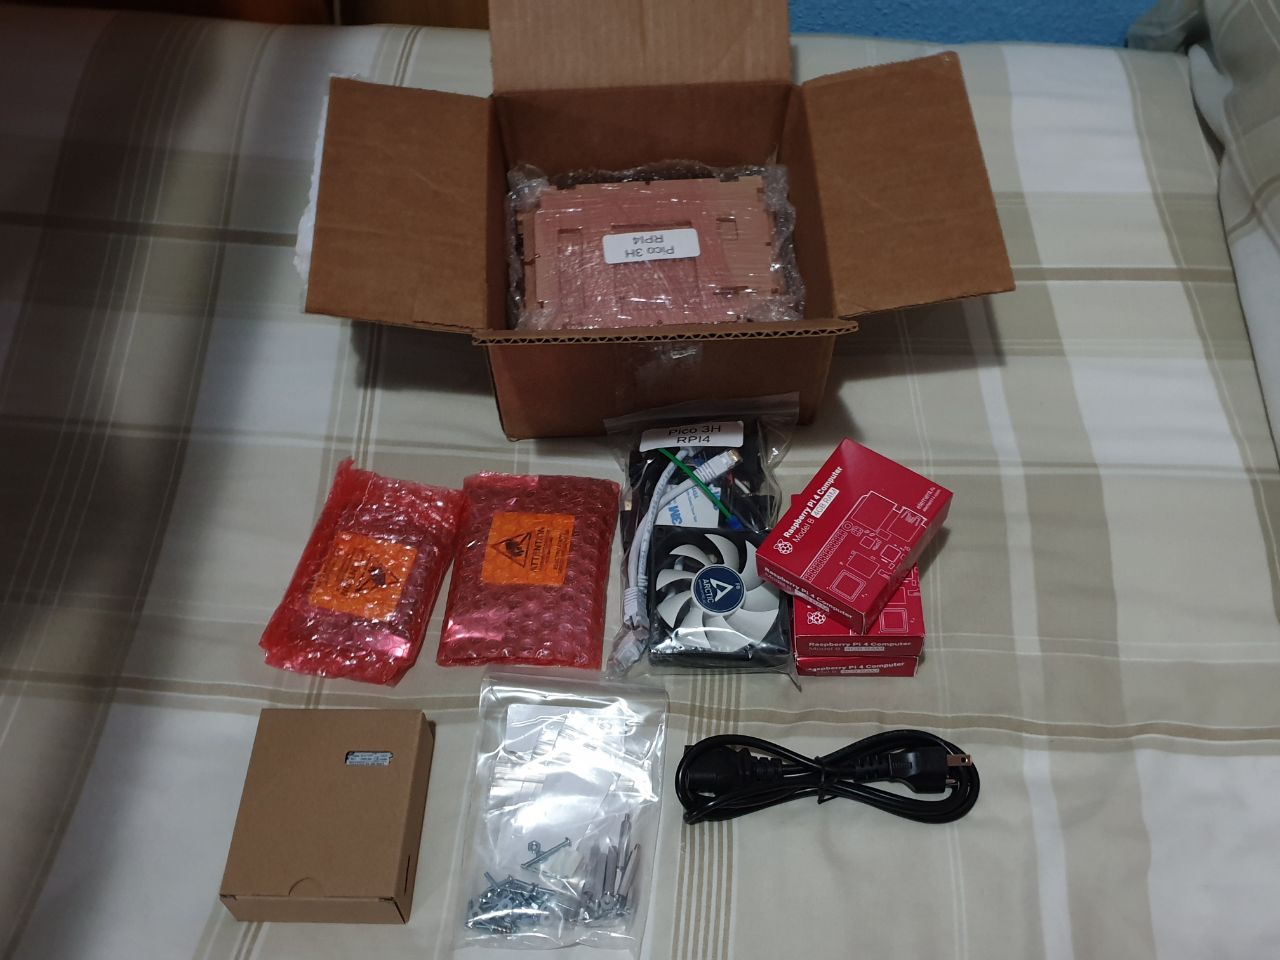
You can ask them to do the assembly process or even install the applications you want into the cluster to avoid wasting time setting it up but… that is not fun right?
The assembly process is documented fairly well in their site and you will only need a screwdriver and some different size heads for it in order to follow all the process.
By the way, you can ask them to only send the parts for the cluster but not the actual boards for it. The thing is that with the chip shortage we have right now the price they sell them for is just too good to not get all from them.
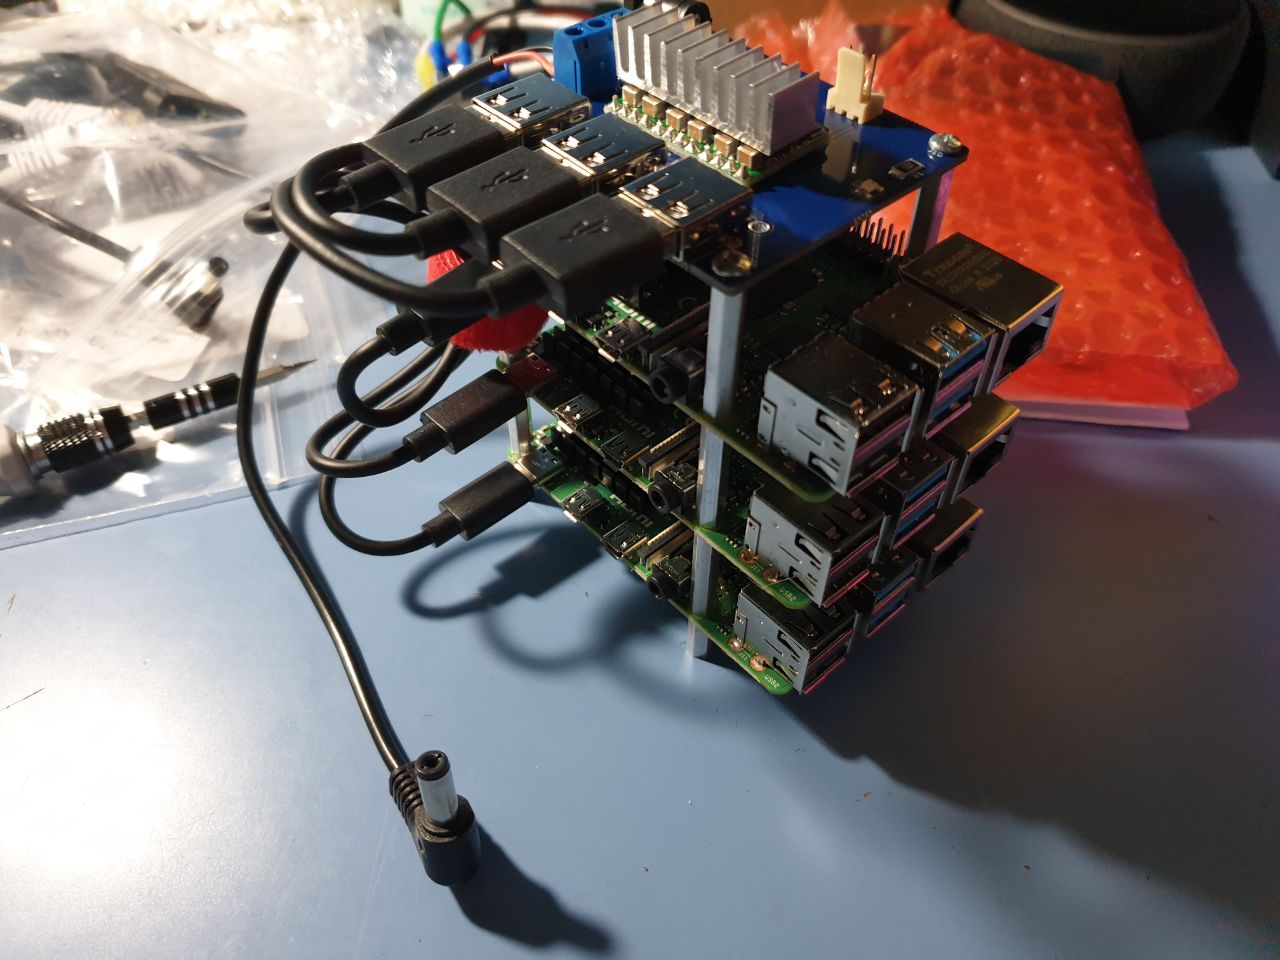
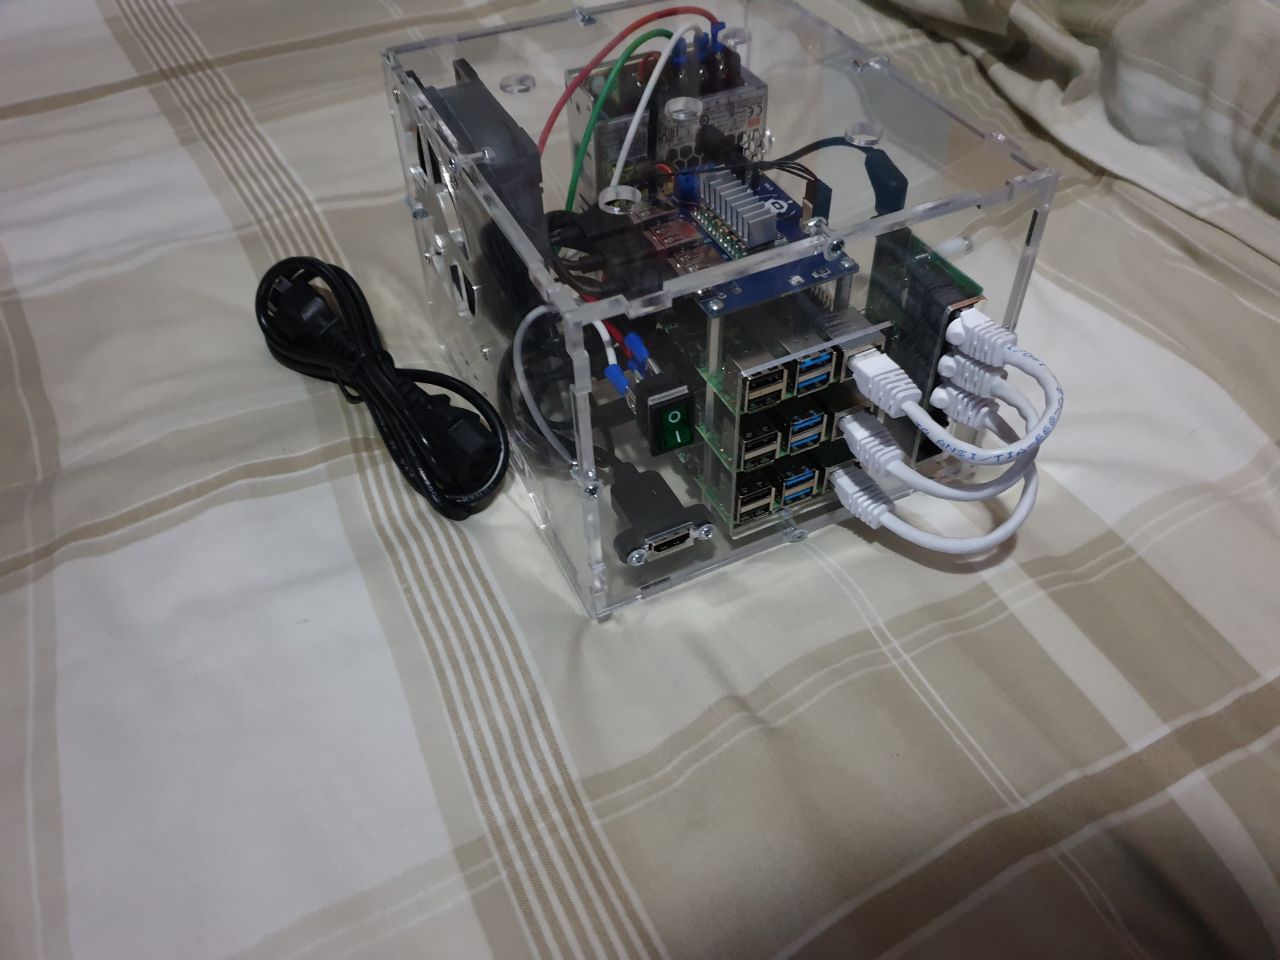
The assembly took me around 2 hours or so but it was pretty fun to do and it looks incredible:
Preparing the SD cards
We have a cool looking cube right now, time to bring it to life! The first thing to do is to prepare the SD cards with Raspbian and a basic headless setup (No monitors please).
In this case I want to use the 64 bit version of Raspbian (Even though it is still under development and have some issues) because since Apple started using ARM a lot of applications work with ARM64 and can be handy. This Raspbian version can be downloaded from here.
I will use the Raspberry Pi imager program to put Raspbian in the SD cards. You can find this software here:

There is an option in the program for custom images that works like a charm:
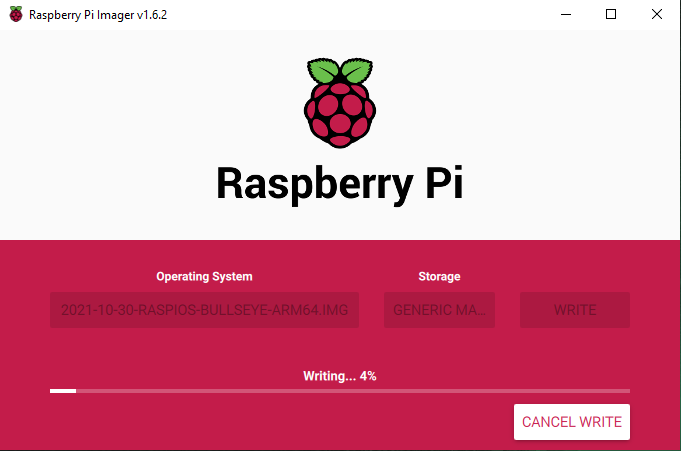
It will take a while just to prepare one card so imagine 3 of them.
Once the cards are prepared, we have to do one more thing. Since we don’t want to use a monitor we have to connect the cards to the computer, open the disk called boot and create a file called ssh . This will enable SSH by default.
The only problem right now is that the IP address for each Raspberry Pi will be provided by the DHCP server so in the first boot you will need to find them in the network.
Initial setup
My idea is to create an ansible playbook to make all the initial setup of the cluster, that way if a terminal failure happens I can just get everything setup in the blink of an eye.
But as I said above, the Raspberrys will have a random IP in the first boot so I will have to connect to them one by one to setup an static IP address and hostnames. After that, I can add SSH key authentication and from there I can start with the playbook to setup everything.
I know it is not perfect because if something goes wrong and I need to reinstall from a clean SD card, I will need to do this whole process of connecting to the Raspberry and make the very first setup by hand before I can use the playbook but I think it is ok for me.
Note: I had an error with the 64 bit Raspbian OS about the locale value. I just executed sudo dpkg-reconfigure locales and generated the language that the error was crying about.
Cluster setup
All the steps described in this section will be included in an Ansible playbook to make this whole process automatic. You can check the playbook here:
Basic Raspberrys setup
Raspbian comes with some stuff configured that we don’t really need, Wi-Fi and Bluetooth for example. To disable them we can just add this to the /boot/config.txt file and reboot:
| |
The next thing is to prevent the default pi user from using the sudo command without a password. This is easy, just delete /etc/sudoers.d/010_pi-nopasswd .
Also, it would be awesome if the Raspberrys date is correct so set the correct timezone:
| |
For my last trick, I will make some changes to harden the system a bit. The home directory of the pi user is world readable so let’s change that:
| |
And since we added a SSH key to the Raspberrys for SSH authentication I will disable the access through SSH using password and also won’t allow root user login. Adding this lines to /etc/ssh/sshd_config and reloading the sshd service will do:
| |
Installing Kubernetes
The Kubernetes version I will be installing is K3S:
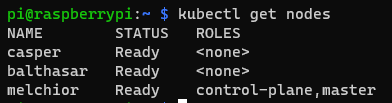
Should include all the normal Kubernetes features but in a more optimized way. The installation is pretty easy to do actually, it is documented very well in the K3S page and the only thing you have to do is to run an installation script in each node of the cluster.
The only thing to keep in mind is that you have to start with the installation of the master node (By default K3S won’t allow you to have more than one) to get a secret token you need for the worker nodes installation.
By default the K3S script will deploy some components to the cluster, for a basic testing environment this is ok but if you want to customize this components configuration you need to tell K3S to not deploy them to avoid getting your configuration getting overwrited in every reboot.
This page shows what parameters to use in order to customize the installation:
Before starting with the installation I will add this parameters into the /boot/cmdline.txt file of every Pi to make sure the containers work as expected:
| |
Master node
Now we are ready to install K3S in the master node. Since I want to use Prometheus to get the metrics from the nodes instead of the typical Kubernetes metric-server I will use -no-deploy metrics-server to tell K3S to not deploy this component:
| |
Once this finish, make sure you get the token for the workers nodes: /var/lib/rancher/k3s/server/node-token and also the kubeconfig file to be able to manage your cluster: /etc/rancher/k3s/k3s.yaml.
Worker nodes
To add you workers node to the cluster just execute this:
| |
Storage provisioning
For persistent volume provisioning I don’t really want to rely in the local path provider that K3S use by default. The problem with that provider is that if a pod is re-scheduled in a different node it won’t be able to access the persistent volume data because that volume is in another node. In order to avoid this problems, I will prepare a NFS server in the original Raspberry Pi I talked you about before and configure a NFS provider in the cluster that points to that server. The NFS server could be in one of the cluster nodes aswell if you don’t have another host to use.
NFS server installation
To be honest the configuration of the a NFS server was easier than I expected. Just install nfs-kernel-server package and prepare a share folder to use.
In the /etc/exports is where you have to configure the share for NFS and also the IPs addreses that can access it. I will let here a little example:
| |
Make sure to run sudo exportfs -ra to update NFS exports and also to check that nfs-server and rpc-statd.service are running.
Cluster configuration
Taints and labels
So we have a Kubernetes cluster but it needs a bit of tweaking
First of all, since I have 3 nodes I want to taint and label the master node to control what applications can be scheduled to it:
| |
I used that taint because I noticed that all the addons (That is the name K3S use for all the manifests that are put in the /var/lib/rancher/k3s/server/manifests folder for deployment) deployed by K3S use that toleration. The label is one I invented.
Tainting the master node will give me control over what pods are scheduled into the master node. The idea is to only allow critical application to be in the master node, this way the master node will be more protected against resource intensive applications that can cause a node to crash.
NFS storage provider
I will use this NFS provider:
Since it offers the installation through Helm and K3S accepts Helm as a way of deploying an addon, just copying this file to /var/lib/rancher/k3s/server/manifests will be enough:
| |
Notice that I added the needed tolerations and node selector configuration to force Kubernetes to schedule the provider into the master node.
After a bit, K3S will deploy all the components of the provider, including a storage class called nfs-storage. This storage class is marked as default but since the pre-installed K3S storage class called local-storage is also marked as default there are 2 options:
- Delete the
local-storagestorage class - Edit the
local-storagestorage class to make it non default
Traefik custom install
The reason why I decided to modify the Traefik configuration is because by default, it won’t be able to get the real IP address of the clients because of the Traefik LoadBalancer configuration.
Before you ask, K3S use something called Klipper to create a load balancers inside the cluster. Normally, a load balancer is deployed outside but K3S do it this way to allow the usage of load balancer services easier.
Adding externalTrafficPolicy: Local (More information) to the spec section of the Traefik service will solve the problem but if I edit this option in the manifest K3S deploys, our changes won’t persist a reboot. Also I want to add a nodeSelector configuration to make sure Traefik is scheduled in the master node.
To achieve this little configuration change, we can create a file called traefik-config.yaml in the same location as the manifests:
| |
And why would I want to do all this may you ask? Why I need the real IP of the clients? Simple, for IP filtering. Using ingresses to access the services in the cluster is great so to expose something to the internet make sense to expose the Traefik LoadBalancer and make Traefik handle the requests. The problem of this approach is that anyone from the internet could reach private services what is not good.
With the configuration change I made, now I can create a Traefik middleware for all the ingresses I want to be private to prevent traffic from the internet to go to them:
| |
The only thing left is asking Traefik to use it where I want. Just adding this to the metadata section of the Ingresses I don’t want to be accesible from the internet will do:
| |
Now the trafic to public services from the internet will pass through the ingress controller but if someone tries to get into a private service will get a Forbidden error message. This configuration is not the best for load balancing but is what I found to expose Traefik.
I added to the k3s-pi-cluster playbook a variable to change the externalTrafficPolicy option to Local or Cluster to let the playbook user decide what are its needs. Later I will explain a bit about how I ended up avoiding to expose Traefik to the internet and therefore using Traefik with the externalTrafficPolicy option set to Cluster as the default Trarfik configuration use.
Monitoring
Since my idea is to have this cluster working 24/7 I need a monitoring solution that can alert me of something happens. I want to use the Prometheus, Alert Manager and Grafana stack for this (Prometheus will be used as metrics API instead of metric-server for thins like scaling pods).
The official repository doesn’t really support the installation on Raspberry Pi at the moment of writting but this repository do:
Cheers to the author because is awesome and works like a charm. Just follow the README file to install it in a K3S cluster. You want to follow the procedure in the master node, ensure openshift Python 3 library is installed.
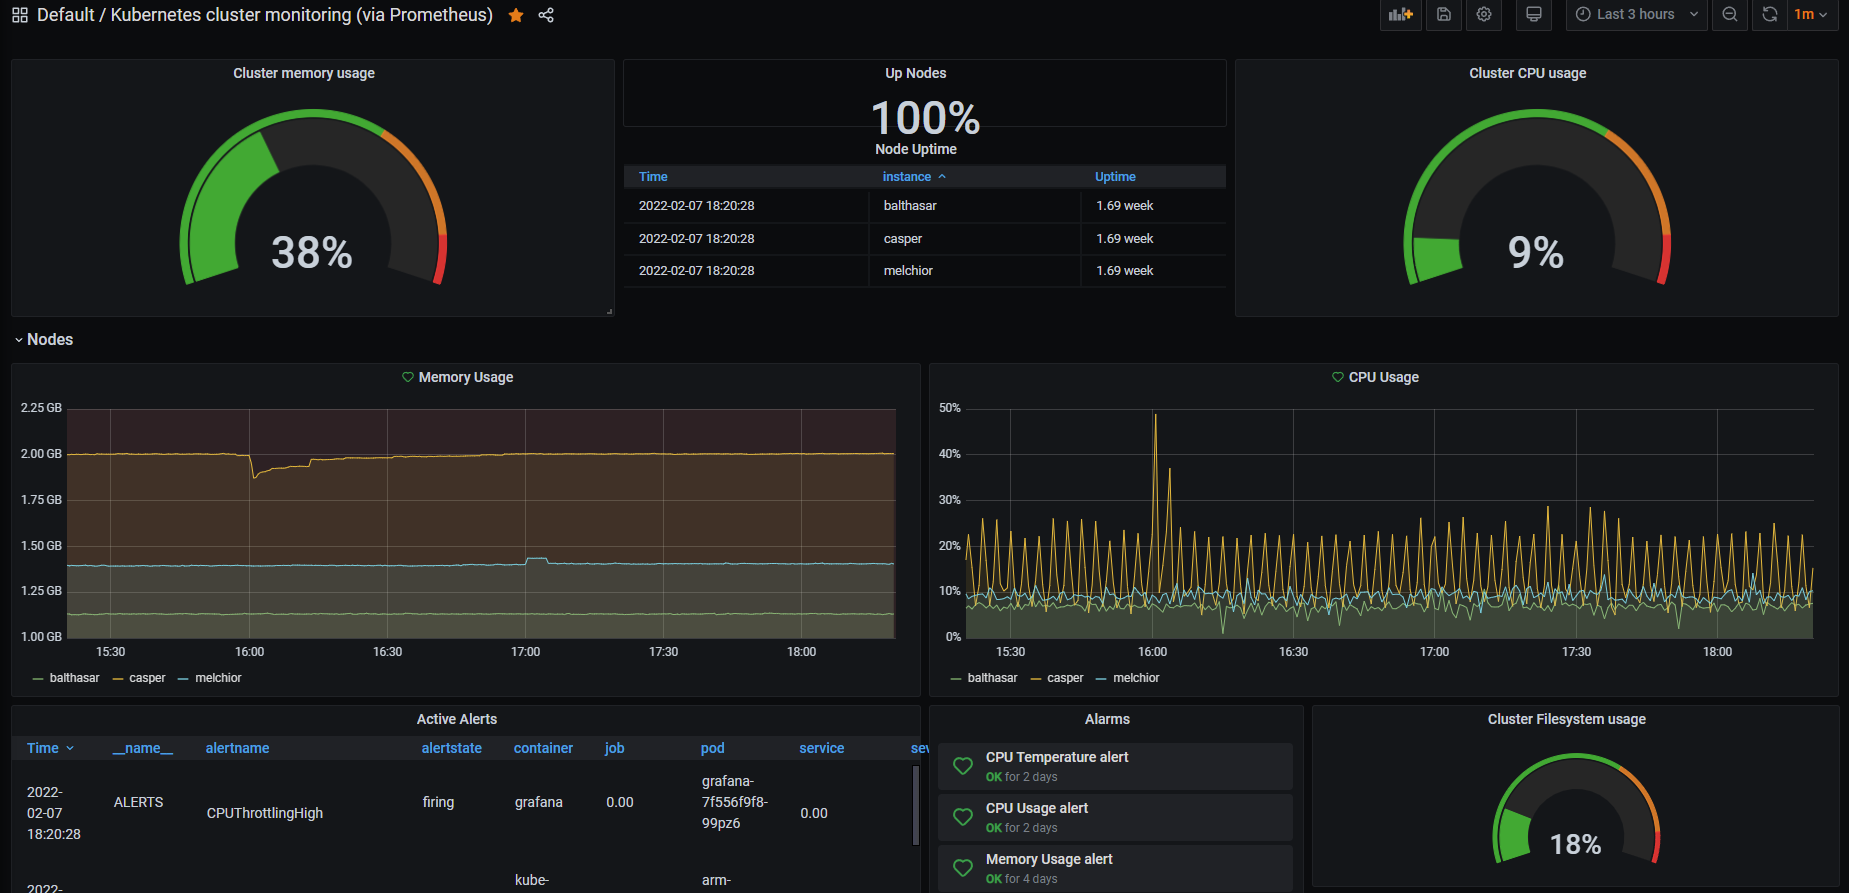
Once everything is installed you should be able to acces Prometheus ,Grafana and Alert Manager. Just check the ingresses information to know where to access the services, this is how Grafana looks (Yeah the picture is one week after configuring all):
Since I don’t think that I will be using Prometheus and Alert Manager much I will just delete the ingresses to them and use kubectl port-forward to access them instead of having them open to the network.
I created a Telegram bot and configured Grafana to send alerts to me using it. It works incredibly well.
Network Policies
NOTE: A message from the future, looks like K3S has Kube-Router controller installed by default for network policies, not as advanced as the Calico ones but enough. Actually, I decided to drop Canal CNI installation from the installation playbook, you can skip this section. If you decide to install Canal, make sure to start K3S with the --disable-network-policy flag.
Checking K3S documentation I noticed that the default CNI was Flannel. Flannel is really cool because is pretty fast but is not able to handle network policies. I really want to limit the conections a pod can do, specially if the pod is accessed from the internet. I normally edit the iptables rules in my Raspberry Pi to handle this restrictions in Docker but since Kubernetes has network policies to handle this stuff I want to use them.
I researched my options here and I found this post about installing Canal:

The idea here is to keep using Flannel as CNI but install Calico as Network Policy manager. For installation just get the manifest here.
And search the environment variable called CALICO_IPV4POOL_CIDR that is commented. Since I’m installing Canal in K3S I need to uncomment the variable and set its value to 10.42.0.0/16, what is the default Pod CIDR that K3S uses.
Just a quick note, during the installation the Canal pods were failing to start. The solution was to delete the flannel.1 interface in every node with:
| |
The pods started without problems afterwards.
I don’t really know if it was a problem I had because of all the things I tested before the installation or something that need to be done when installing Canal and Flannel is already running.
Handling certificates and application security
Last thing I need to finish the migration to Kubernetes is an easy way for issuing and managing TLS certificates and some kind of WAF. The solution I found to have this kind of stuff in Docker was this image:
Basically is Nginx, Certbot and Fail2ban working toguether. Kubernetes could work well with this solution using the externalTrafficPolicy: Local option in the Traefik load balancer to block the real IP address of the clients. The things is that, this is not something I want to use because doesn’t really scale well, the certificate management is pretty poor and I would need some kind of dashboard to really check what Fail2ban was doing.
For certificates the easier approach is to use cert-manager:
The manifest need a little tweak to work with ARM, it is necessary to look for all the images used and add -arm at the end of all the image names. For example, if the image is image:1.0 it is changed to image-arm:1.0. With that changes I was able to install cert-manager without problems.
Only one thing left for certificates, cert-manager need you to configure issuers to know how and where to ask for certificates. You can check how to create an Issuer in the cert-manager documentation.
I created an issuer with the ClusterIssuer kind instead of Issuer, that way the issuer would be able to work in all the namespaces, and Let’s Encrypt as the CA to use. This issuer was configured to use a HTTP challenge in the port 80 that allows Let’s Encrypt to verify that the domain is mine.
I will show you what changes to make to an ingress to ask for a certificates to the configured issuer:
| |
The secret name can be anything you want really but please, use a proper name to know what the secret contains.
I had some problems to make this work because I was using really strict network policies and I forgot to allow the cert-manager pod to have ingress connections to the port 80 for the http challenge.
If the certificate is issued correctly you should be able to see that the certificate is ready executing this:
| |
Also you should be able to see that the certificate is valid visiting the site. I only have a problem now, no Fail2ban in front of the services facing the internet.
The first thing I tried was to use Cloudflare proxying to filter the traffic. This works great but you should also filter the IPs that enter your network to only allow Cloudflare IPs to avoid attackers trying to bypass the Cloudflare protection. While checking for the Cloudflare IPs is when I found my favourite solution until now:
This thing is just awesome, it allows you to create a tunnel between Cloudflare and you to avoid opening ports in the router or firewall. This actually fix another problem I have that I didn’t tell you about yet, my ISP blocks port 443 because apparently they use it for maintenance so for hosting the web services I have to use weird port numbers in the URLs. With Cloudflared the Clouldflare bypass and the port problems are fixed. Hosting a website in the internet without open ports, ideal.
To use this system, the only thing really needed is a Cloudflare account and a domain. The rest is to follow the documentation to set it up correctly. I created a little Helm chart that will help if some of you wants to use this approach:
I almost forgot, remember the HTTP challenge I used for getting the certificates with cert-manager? Well if I close the router ports obviously this stops working, there is a solution though. Let’s Encrypt allows another method for validation and it is called dns01 in cert-manager:
It is true that is not as easy to setup as the HTTP challenge but with this new approach that is just the way to go.
Some tips
Importing images to K3S
Trying to migrate an application I had that uses an image that was not in Dockerhub made me discover that it is possible to just import images to the K3S image store:
| |
The only bad thing is that, each node have its own image store so you have to import the image too all of them in order to avoid problems with scheduling.
I guess a much better solution could be to host my own image registry in the cluster o my Raspberry Pi but this works too.
K3S snapshots
Using the default K3S database, sqlite, makes the creation of snapshots really simple. Just stop the K3S service and copy the entire /var/lib/rancher/k3s/server directory for restoration (Obviously after the copy, start the K3S service again).
Last Thoughts
The journey was pretty long and I really had lot of problems to get some things exactly as I wanted. But now that everything is working I can say that the migration was really a success, my old Raspberry Pi can now just focus on essential applications that support my internal network like the Samba, Pihole and NFS servers and the cluster will handle all the rest of the stuff including all those services that I want to expose to the internet.
The management of exposed services with Kubernetes is much simplier using network policies and cert-manager and the addition of Cloudflared (I know I could use it in Docker too but let me be happy with it) fixing all the problems with the ports and giving me a WAF with a fancy dashboards is just perfect.
PD: Someone noticed the Evangelion references?